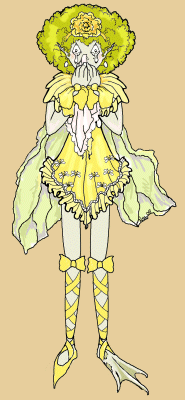
Putting Together
The Willamette Puppet
 Getting Started:
There are just a few steps and a few tools you will need. You will need to print the puppet in on card stock. Then you will need scissors, a hole punch, mini brads. A small piece of Styrofoam
and a small stick or skewer for a handle.
Card Stock:
The easy part is going to be printing the puppet out on 65 lb., 90 lb., or even 110 lb. card stock, unless of course, you haven't any. Then it would be best to print out the puppet to color on regular copy paper, cut them out and trace them onto heavier paper. A old manila folder, or paper of the same weight as manila folders works fine.
Copy Paper:
You can also just print out the puppet on
copy paper and glue the pieces together over another
sheet in any way you like, although I think the puppets
would prefer not to have their feet on their arms or their
heads on their elbows.
Getting ready for the Brads:
After you color your drawing and before you start cutting use a large sewing needle or push pin, ![]() and put a small hole in the center of each of the black dots that mark where two parts of the puppet go together. For a push pin, poke it all the way in to make the right size hole. These holes don't need to be very large because you can work the brads carefully into them and that will keep them tight. A few layers from a corrugated cardboard box makes a good surface to put under the drawing while you make the holes.
and put a small hole in the center of each of the black dots that mark where two parts of the puppet go together. For a push pin, poke it all the way in to make the right size hole. These holes don't need to be very large because you can work the brads carefully into them and that will keep them tight. A few layers from a corrugated cardboard box makes a good surface to put under the drawing while you make the holes.
Be careful about your fingers.
Cutting Out the puppet:
Use a good pair of scissors, be patient and cut slowly - you can do it!
Please ask an adult to help if you are unsure of
yourself or very young.
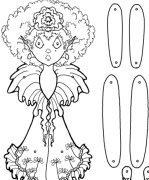
 Putting it all Together:
You can now find teeny tiny brads with small
colorful mini flowers or mini stars or small round head brads in the scrap booking
department of most craft stores. These are perfect for
assembling paper puppets. You can use what ever you like.
By now, you have made the very small holes for the mini brads,
carefully work the prongs through the holes from the
front of the top piece to the back of the last piece and spread the legs of the brad in the back. Try to keep them a bit tight so the puppet will hold a pose.
The upper arms go in back of the shoulders. The lower
arm goes in front the bottom of the upper arm and the wrist goes over
the bottom of the lower arm,
The upper legs go in back of the skirt. The lower
legs goes in front the bottom of the upper legs and the feet or frog foot goes over
the bottom of the lower leg
Having fun with a puppet
You can add a "handle" on the back of the puppet or
hang them up on a wall or curtain in different poses.
![]()
Willamette Puppet
Click then Print
Willamette
Coloring page
![]()
Have a great idea. Share your thoughts with us!
Click to send a comment to
Phee McFaddell
Phee's |
Home Page |
Who's Phee |
Stories
Picture Books |
Crafts |
Coloring Projects |
Gallery
Comments |
News Letters |
Guest Book |
Search |
Artist's Page
Links |
Phee's Coloring Book